To replace thermal paste on your CPU, first power off your computer and disconnect all cables. Use a Phillips screwdriver to remove the cooler and access the CPU. Clean the old paste with isopropyl alcohol and lint-free wipes, ensuring the surfaces are spotless. Apply a pea-sized amount of new thermal paste in the center of the CPU and reattach the cooler using a diagonal tightening pattern. For detailed steps and tips, keep exploring the process further.
Key Takeaways
- Power off the computer, disconnect all cables, and ground yourself with an anti-static wrist strap before starting the replacement.
- Remove the cooler by unscrewing it according to the manufacturer’s instructions to access the CPU.
- Clean the old thermal paste from the CPU and cooler using isopropyl alcohol and lint-free wipes until no residue remains.
- Apply a small, pea-sized amount of new thermal paste at the center of the CPU’s Integrated Heat Spreader for optimal distribution.
- Reattach the cooler using a diagonal tightening pattern and monitor CPU temperatures to ensure effective heat transfer.
Importance of Thermal Paste for CPU Performance
When it comes to CPU performance, the significance of thermal paste can’t be overstated. This essential compound enhances heat transfer between the CPU and the CPU cooler, ensuring efficient thermal conductivity.
Without effective thermal paste, air pockets can form, severely hindering the thermal interface and leading to increased operating temperatures. Modern CPUs can reach junction temperatures near 100°C, with thermal throttling starting around 80°C.
High-quality thermal paste fills microscopic imperfections, reducing thermal resistance and enhancing cooling efficiency. Regularly replacing thermal paste every few years or when removing the cooler is vital for maintaining peak performance and preventing overheating.
Tools Needed for Replacing Thermal Paste
To successfully replace thermal paste on your CPU, you’ll need a few essential tools.
Start with a Phillips head screwdriver to disassemble the CPU cooler. An anti-static wrist strap is vital to prevent electrostatic discharge that can damage components.
Begin with a Phillips head screwdriver to remove the CPU cooler, and don’t forget your anti-static wrist strap to safeguard your components.
Wear nitrile rubber gloves to protect your skin and keep surfaces clean. Isopropyl alcohol (70% or greater) is necessary for cleaning the old thermal paste from the CPU and cooler surfaces.
Use ESD cleanroom wipes or coffee filter paper, as they minimize lint. Finally, have your thermal grease ready for peak performance once you’ve prepared the surfaces.
Step-by-Step Guide to Accessing the CPU Cooler
Before you start disassembling your computer, make sure it’s powered off and all power cables are disconnected for safety.
To access the CPU cooler, remove the screws securing the side panel of your desktop and lay the case on its side for easier access to internal electronic components.
If you’re working on a laptop, consult your manufacturer’s manual or resources like iFixit for specific disassembly instructions.
Use an anti-static wrist strap to ground yourself.
When you’re ready to remove the CPU cooler, refer to the assembly guide for your cooler type, ensuring not to force any components during the process.
Cleaning the Old Thermal Paste
Cleaning the old thermal paste is essential for ensuring ideal heat transfer between your CPU and cooler.
Use Isopropyl alcohol (IPA) with a concentration of 70% or greater to effectively dissolve the old paste. Apply the IPA to ESD cleanroom wipes or coffee filter paper, as regular tissues may leave lint.
Use 70% or higher Isopropyl alcohol on ESD wipes or coffee filters to remove old thermal paste effectively.
Carefully clean both the Integrated Heat Spreader (IHS) of the CPU and the cooler surface until the wipes show no discoloration.
Allow at least five minutes for the 70% IPA to evaporate fully; however, 99% IPA requires no waiting time.
Always wear powder-free nitrile gloves to maintain cleanliness during this process.
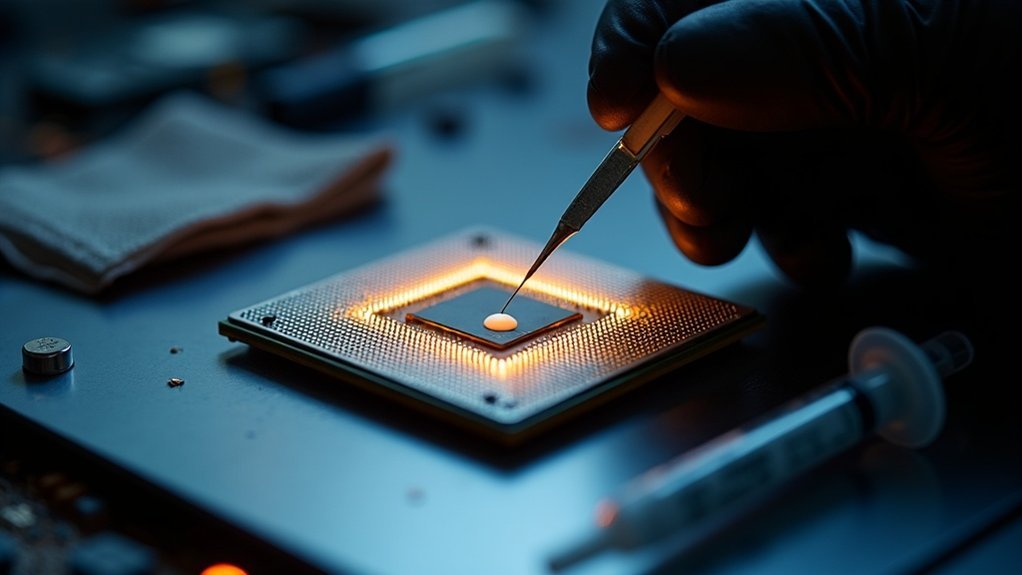
Applying New Thermal Paste Effectively
Now that you’ve cleaned the old thermal paste, it’s time to apply the new paste properly.
Place a small amount, about the size of a pea or rice grain, in the center of the CPU’s IHS.
This guarantees even distribution when you mount the cooler, which is vital for maintaining ideal temperatures.
Cleaning Old Paste
Properly cleaning old thermal paste is essential for peak CPU performance.
Start by using isopropyl alcohol (70% or greater) with ESD cleanroom wipes or coffee filter paper to avoid lint. Carefully clean the integrated heat spreader and heat sink until no discoloration appears on the wipes. This guarantees all residues are removed, preventing air gaps that can hinder thermal conductivity.
Wear powder-free nitrile gloves during this process to keep surfaces free from skin oils. A thorough cleaning will set the stage for applying thermal paste correctly, ensuring efficient heat transfer and maximum CPU functioning.
Applying New Paste
Once the old thermal paste has been thoroughly cleaned, it’s time to apply the new paste for ideal heat transfer. Start by placing a small amount of thermal paste, about the size of a pea, at the center of the CPU’s Integrated Heat Spreader (IHS).
| Action | Purpose |
|---|---|
| Apply new thermal paste | Guarantee even distribution |
| Install CPU cooler | Spread paste adequately |
| Fully tighten the screws | Maintain even pressure |
Use a diagonal tightening pattern to secure the cooler, preventing excess paste spillage that can cause short circuits at high temperatures. Regularly check your CPU thermal performance.
Reassembling Your CPU and Cooler
When reassembling your CPU and cooler, make sure to tighten all screws securely using the correct torque to avoid uneven pressure.
Use a crisscross pattern to distribute pressure evenly, ensuring consistent thermal contact.
Finally, double-check that all components are in their original positions and that no tools are left inside the case to prevent damage.
Proper Screw Tightening Techniques
Achieving ideal thermal contact between your CPU and cooler hinges on effective screw tightening techniques.
Start by lightly securing all screws to eliminate slack, then follow the manufacturer’s torque specifications. Use a crisscross pattern to tighten screws, ensuring even pressure distribution across the CPU IHS, which prevents thermal hotspots.
Tighten incrementally, alternating between screws to maintain uniform pressure without warping the cooler or IHS. Over-tightening can damage the CPU or motherboard, so be cautious.
Finally, double-check that all screws are secure, leaving none loose to guarantee excellent thermal contact and system stability.
Ensuring Component Compatibility
Before you reassemble your CPU and cooler, it’s crucial to verify that all components are compatible to prevent any issues down the line. Here are three key checks:
- CPU Socket Type: Ascertain the cooler’s mounting mechanism matches your CPU socket type to avoid misalignment.
- Dimensions: Confirm that the cooler fits within your case, especially if using larger cooling systems that may obstruct other components.
- Thermal Paste: Verify the thermal paste is suitable for maximum thermal conductivity between metal surfaces, enhancing the interface material’s performance.
Double-check all screws are tightened and no leftover components are present before powering on.